

Those of you who follow my Flickr feed will have seen a couple of photos of my Black Macbook (affectionally known as BlackBook the Second), as it’s going through the process of getting the Photocritic.org URL engraved on the back – WITH LASERS! Obviously, everything to do with lasers has to be in all caps. Those are the rules.
Sadly, it seems as if something Bad Happened when I had my laptop engraved – luckily, the technician who did it has a solution: Why not colour it in with a Sharpie?
Back story
I’ve had my BlackBook for quite a while now, and I was considering replacing it in favour of one of those rather tasty-tastic new 13" Macbook Pro computers… One of my friends recently bought one, and my credit card has been sizzling in my pocket ever since. On the other hand, my current BlackBook is still relatively current, and it’s been upgraded to the max (I don’t remember what it started its life as, but it’s now a 2.0Ghz/4GB RAM/250GB HDD monster, which is perfectly adequate for most task, and still has reasonable battery life). So instead of plunging £1300 on the 13-inch MacBook Pro I’m lusting after, I decided to keep the BlackBook for another few months – or at least until the Apple Care runs out in March 2010.
To celebrate potentially saving £1300, I decided to spend £100 on getting the BlackBook laser engraved, because, well, lasers are reason enough in themselves.
 I did a bit of Googling, and settled on using RazorLab; For one thing, if it’s good enough for Apple, it’s good enough for me, but also, they were among the first to get back in touch with me with a coherent response, and they’re based only a 10-minute motorbike ride from my house.
I drafted in a good friend of mine to try and help me design the logo; and while his design was absolutely wicked, it was a little bit too complicated. Instead, I ended up getting a vector graphic off istockphoto, and using that as the basis of my design.
At Razorlab
 So, I booked my appointment, and went to see the lovely Soner who runs RazorLAB – he’s a true inspiration of a man; some of his product designs that were kicking around his office were positively brilliant. He took a look at my mock-up design, and discarded it out of hand; turns out that the machine can only handle vector graphics – luckily, I had also sent him the font I use on the logo and the vector, so we re-created it on his computer.
Then, a whole lot of precise measuring, placing the laptop inside what is, essentially, a fancy laser-printer (literally! It even uses printer drivers, which really amused me for some geeky reason) which can burn through all sorts of material. Thankfully, the engraving on the laptop was done at 30% power; I didn’t fancy having ‘photocritic.org’ permanently etched into my motherboard either.
About 45 minutes, a lot of interesting discussions about lasers, product design, Life as a Laser Etcher and £95 later, I was back on the street outside of RazorLab, with a freshly engraved MacBook and a renewed spring in my step.
The results
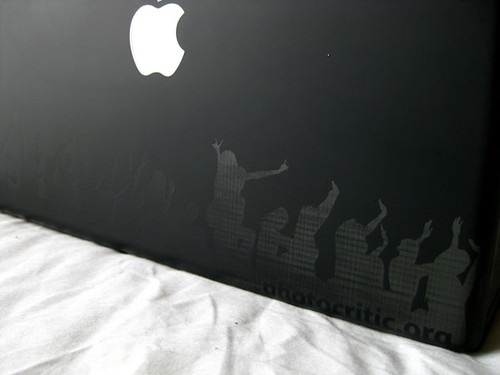
 When we were doing the etching, Soner did warn me that engraving large surfaces could cause some streaking; he also showed me an aluminium casing which had some slight streaking on it – not so much that I would be worried about it; it still looked pretty awesome. On my laptop, there was some white on some of the engraving, which Soner said was dust – so when I got home, I tried to clean it off, but to my surprise, it was going nowhere – whereas half of the laptop is very subtle (in fact, it looked bloody awesome – you can tell something is engraved on there, but you have to look quite closely to see what is engraved; it looks brilliant), the other half is streaked and milky white.
I tried cleaning it a couple of times, but the streakyness continued – so I e-mailed Soner to find out what I should do. Not much, as it happens: He said that “The problem with engraving big areas is that as the laser head moves away from the origin point (in this case top-left), the engraving results in different streak patterns -because of acceleration and speed changes at far corners”. It seems as if the problems are quite rare, too: “so far, we did not have any complaints with regards to this issue as people usually treat this as part of the process -it is within laser engraving’s nature to do these kind of effects.”
Of course, I knew I was going to be writing this review, so I tried to find out if there was any way to solve the issue – To be honest, and as I told Soner, I don’t mind the streak patterns, I actually think they are sort of cool, the issue is that they aren’t really even across the whole back of the laptop – the other thing that confuses me is that when you do a quick search on Flickr for ‘blackbook laser engraving’, you’ll see that there’s loads of people who have quite elaborate engravings on the back of their laptops – both with big areas and smaller areas – and while streaking is evident in some of the photos, it’s never uneven from one side of the laptop to the other; also most blackbooks seem to go a bright white when they are engraved (see this one, this one, this one, this one and this one, just to get a feel for it).
I spoke to Soner about trying to find a solution, and he said that while it would be possible, in theory, to re-do the engraving; in practice it’s impossible to line-up the laser with the previous engraving, so there wasn’t much that could be done.
What to do, then? “The only suggestion I could give is to paint the white areas with a permanent black marker. That should help to get rid of the gray gradient.”
So there we have it, I guess – As high tech as laser engraving is, if something goes wrong, the only thing you can do, it seems, is to break out your Sharpie.
Needless to say, I’m not particularly happy with the final outcome of the laser engraving, but as you can see from the Flickr links posted above, it’s possible to get gorgeous results. If anyone know what went wrong here, feel free to post a comment below – in the meantime, I’d probably recommend thinking twice about getting your expensive equipment laser engraved.
Photos!
For the photo gallery, check out these here pics on Flickr; or keep on scrollin’:

The original design I came up with, before we had to re-create it as a vector
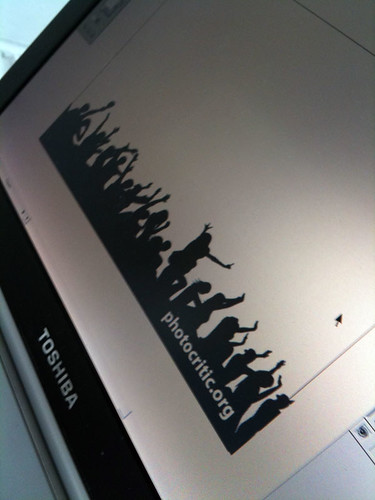
The design is ready!
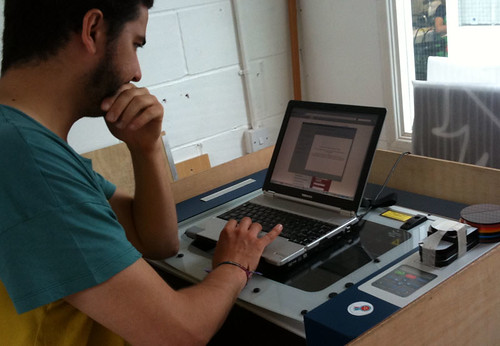
Soner preparing the LASER
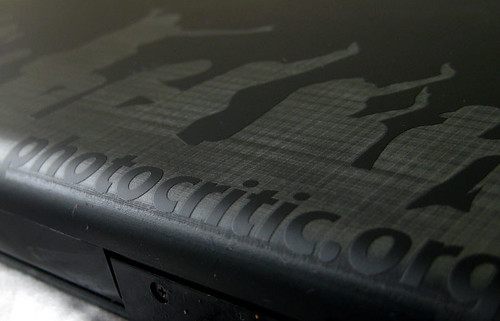
Results close-up
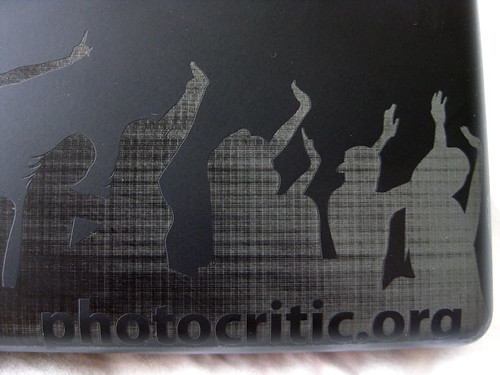
Results close-up: the URL
The back of the laptop

I completely love the subtlety of the left-hand side of the laptop – just such a shame about the white streaky mess on the right-hand side of the lappy, where the logo is :(
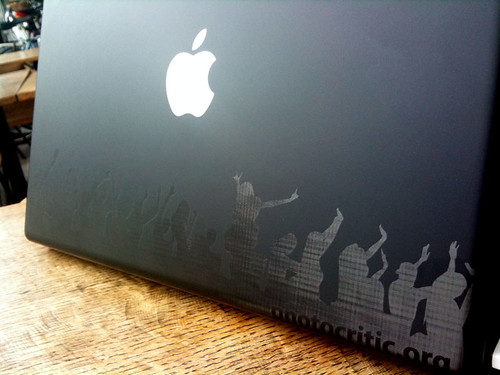
Looks pretty good when I’m working in a cafe – shame the logo is a bit lower than I had hoped (it is not really visible when the laptop is standing on a table – I’d hoped it was about 2 cm higher)
Featured on the Consumerist!
Seems as if one of my favourite publications – The Consumerist picked up on this story and did a short feature on it – which in turn attracted some good advice from Shane (see comment #2, below). Thanks for your help everyone!
Do you enjoy a smattering of random photography links? Well, squire, I welcome thee to join me on Twitter - Follow @Photocritic
© Kamps Consulting Ltd. This article is licenced for use on Pixiq only. Please do not reproduce wholly or in part without a license. More info.