Table of Contents
In this Electronic Signature Tutorial, you’ll learn how to sign PDFs online.
Adobe Sign is a leading e-signature software that allows you to securely collect signatures online.
As the remote work culture becomes the new normal, it’s important for businesses and individuals to move some of their activities, such as signing documents online.
And this is where tools like Adobe Sign comes into play.
How to Sign PDFs Online with Adobe Sign?
Step 1: Getting Started with Adobe Sign

Depending on what country you’re in, the interface might look slightly different.
Now, follow these steps laid out below:
- Click on ‘Start free trial’
- Choose ‘Acrobat Pro DC with e-sign’ if you’re looking for e-signature capabilities. Select ‘Acrobat Pro DC with advanced e-sign’ if you need additional features like collecting payments, posting e-signable forms online, and more. In this Adobe electronic signature tutorial, we’re choosing the former.
- Click on ‘Free trial’ under the first option
- To start your 7-day free trial, enter your email. If you cancel before the 7 days are up, you’ll be issued a full refund.
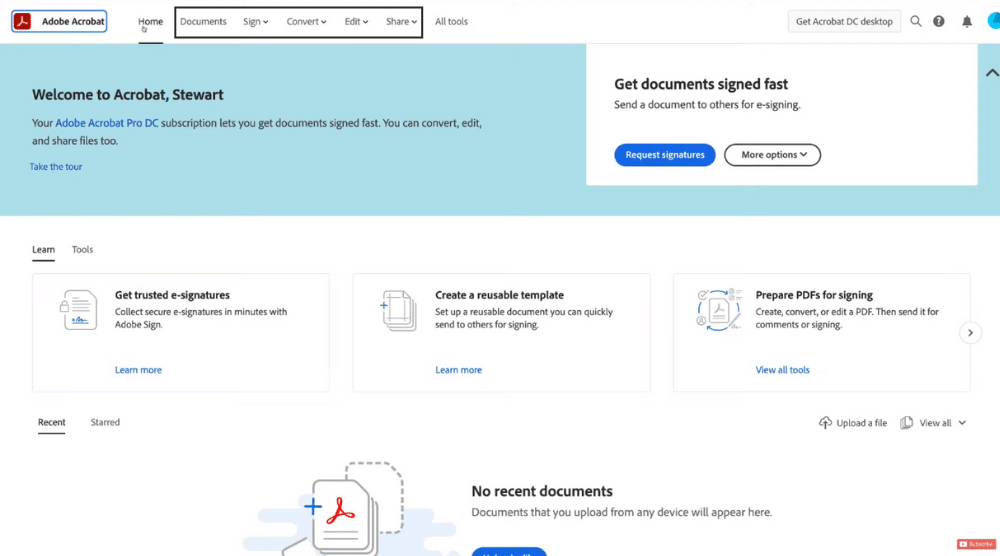
Once you’re done with the initial setup, you’ll arrive at Adobe Acrobat.
Step 2: Exploring Adobe Acrobat

Here you’ll find all the documents uploaded to Adobe Acrobat.
Next to ‘Documents’, we have ‘Sign’.
This is where you can:
- Request Signatures: send documents to others for signing
- Create a Template: a reusable document that you can send to others
- Fill & Sign: complete an online form and then add your signature
- Add Signature: sign a document yourself
Next to ‘Sign’, we have ‘Convert’.
As the name suggests, this is where you can convert documents using Adobe Acrobat.
For instance, you can convert PDF to Word, PDF to PPT, PDF to Excel, and more.
And, next to ‘Convert’, you’ll find ‘Edit’.
This is where you can go ahead and edit your PDF documents.
You can:
- Edit text & images
- Add comments
- Add text
- Recognize text
Adobe Acrobat is an all-in-one place where you can not only sign PDFs with e-signatures but also convert and edit documents.
Next to ‘Edit’, you’ll notice ‘Share’ where you can share your files and secure PDFs online.
Since the focus is on electronic signature, we’re not going to discuss ‘All tools’ in this Adobe electronic signature tutorial.
Step 3: Uploading Documents to Adobe Acrobat

With the same document, we’ll also explore other features that Adobe has to offer, later in this tutorial.
To upload a document, navigate over to ‘Documents’ at the top and click ‘Upload a file’.
Locate the document that you want to send to your clients or that you want to sign and edit.
Click ‘Open’.
Our next step is…
Step 4: Requesting an E-signature

- Click Sign > Request Signatures
- Add the recipients’ emails
- By clicking ‘Add Me’ on the right, you can also add yourself. Since we’ve ‘Email’ selected, the recipient(s) will receive a link to this document via email
- Under ‘Message’, enter the agreement name and customize the description if you like
- By clicking ‘Add Files’ you can select a template, upload a file, or choose ‘Document Cloud’ to add files that have already been uploaded to Adobe Acrobat.
In the previous section of this Adobe electronic signature tutorial, we uploaded a document.
You’ll find it in ‘Document Cloud’. Select it and click ‘Attach’.
Feel free to password protect the document or set a reminder.
Once you’ve added all the information, hit ‘Next’ at the bottom.
Step 5: Set Signature Fields

- Locate the area that you need your recipients to sign
- Add the name of the client and title at the bottom of your document
- Click on the area where you need your client to sign and a box will appear. Drag to adjust the size of the signature box
- Click ‘Set signature field’. You can also add a text field if you like
- Click on the three dots to set as signature date field or email field, amongst other options
Now, head over to the ‘First name’ field under a client and click to make the box appear again.
Click on the three dots and select ‘Set as signer’s name field’. That’s going to add ‘Full Name’ in there.
You can do the same for ‘Last Name’ as well. In the Title area, just select ‘Text’.
If you turn ‘Advanced editing on’ on the right and scroll down to the bottom of your document, you’ll find more options such as initials, signature block, and stamp under ‘Signature Fields’.
Under ‘Signer Info Fields’, you’ll find advanced editing options like title, company, name, email, and date.
Notice the data fields and transaction fields as well.
However, we’re not going deep into that in this electronic signature tutorial.
You can now either save this document as a template or send it to your clients (see bottom right).
We’ll do both – save as template and send!
Refer to the screengrab to see what it looks like from the recipient’s end.
Click ‘Review and sign’ to open the document from your email.
Now, if you click on the signature field, you’ll find the option to:
- Type your signature
- Draw the signature
- Upload an image
- Create your signature on a mobile device. Add your phone number and click ‘Send’ to begin.
For this Adobe electronic signature tutorial, however, we’re going to draw the signature.
To do that, select ‘Draw’. Now, draw your signature, enter your name, and hit ‘Apply’. Your e-signature has been added.
You’ll also notice that your first name has automatically been generated in the ‘First name’ box based on the form field we added earlier.
As a recipient, you’d need to add your last name, title, and hit ‘Click to Sign’ at the bottom.
You can now download the signed copy if you like.
Let’s break down a few more features before we wrap up our electronic signature tutorial.
Head back to Adobe Acrobat. On the home page, you’ll notice a number next to ‘In progress’.
This is where you can see the number of documents that are yet to be signed. Currently, it’s zero.
Scroll down a little and under ‘Recent’ you’ll notice your recently-signed document as well.
Step 6: Fill & Sign

Scroll down to the bottom and type in your information.
If you click the three dots over any field, you can add an ‘X’, a tick, a dot, or a circle
Also Read: Create QR Code for FREE
Adobe Electronic Signature Tutorial (Video Guide)
Adobe Sign allows you to capture e-signatures and edit documents online without having to meet in person or get sent a physical copy to sign.
This electronic signature tutorial will help you make the most of Adobe Acrobat.
Check out our full video guide below.


