
How To Make A Beautiful Gingerbread House With Lights
Christmas and baking go hand in hand, they are best friends, bosom buddies, inseparable. If there are no baked treats, then no Christmas - right? I think you get my drift!
I started planning from the beginning of November what yummy delights I could make this year for Christmas. I had a whole list that I wanted to share with you, however, I am trying to fit in precious baking time around other work commitments. Still not an excuse, I can always try to squeeze in a moment to get some baking done.
One of the items on the top of my list was to make a gingerbread house. I’m sharing a secret here, ssshhh! I’ve actually never made one before! I know a baker/cake decorator that has never made a gingerbread house! Well, no time like the present, so let’s get that rectified!
I know it’s my first gingerbread house, but I still wanted to do everything from scratch including adding lights. I have a variety of things I want to show you.
How to make gingerbread (construction gingerbread dough/recipe)
Gingerbread house PDF template
Cutting the gingerbread house pieces /bake them
Decorating & Constructing the gingerbread house
Finishing Touches
It sounds like a mammoth task, but if I could EASILY do this and it was my first gingerbread house. I know you can as well; so I will show you exactly how I did it. It is great for beginners!
Gingerbread Dough
I did a lot of research and experimenting on this, so I have done the hard work for you. My first thought was to ensure the gingerbread dough, could be sturdy, solid and hold up for construction,

The best gingerbread dough I came up with doesn’t require any leavening agents. By not adding leavening agents, this ensure that the dough does not spread during baking. This is really important when making gingerbread houses or other gingerbread constructions that are required to be precise.
Fragrant Spices
I have added fragrant spices to this gingerbread dough. The beautiful aroma that lingers around the house as it bakes is wonderful. It will make your home smell like Christmas. You can leave the spices out if you wish to do so.
However the spices will help to keep ants and other creepy crawlies away, since cinnamon, cloves or mixed spices are known for repelling insects. So you if you plan on keep your gingerbread for an extended length of time, it best to add the spices.
Molasses or Dark Corn Syrup?
You can use either molasses or dark corn syrup or do half-and -half of both. I find that molasses give a nicer intense flavour and colour to the dough. I did however on this occasion have to use dark corn syrup, since I could not get my hands on any molasses in Chiang Mai, Thailand. I think other people had the same idea, to do some baking for Christmas as well. If you do use dark corn syrup, your dough will be lighter in colour, if you happy with this leave it. If not, you can add 1 tbsp cocoa powder, just to enhance the colour of the dough, the taste does not come through once baked.

The dough is super easy to make. Once you have made the dough, it is imperative that you chill the dough first before using it, at least an 1 hour is good, overnight is even better.
Gingerbread House Template
You can use the gingerbread house template that I have adapted. It is a single storey house, so easier to construct. Maybe next Christmas we can go for a bigger gingerbread house, but for now better to keep things on a smaller scale. The size of this gingerbread house is H: 5.5” x W: 7.5” x D: 6” (including the porch/doorway).
Click this link for the PDF: FREE GINGERBREAD HOUSE TEMPLATE

To further help with the dough not spreading during the bake, place the cut out pieces to chill in the fridge for about 10 -20 minutes.
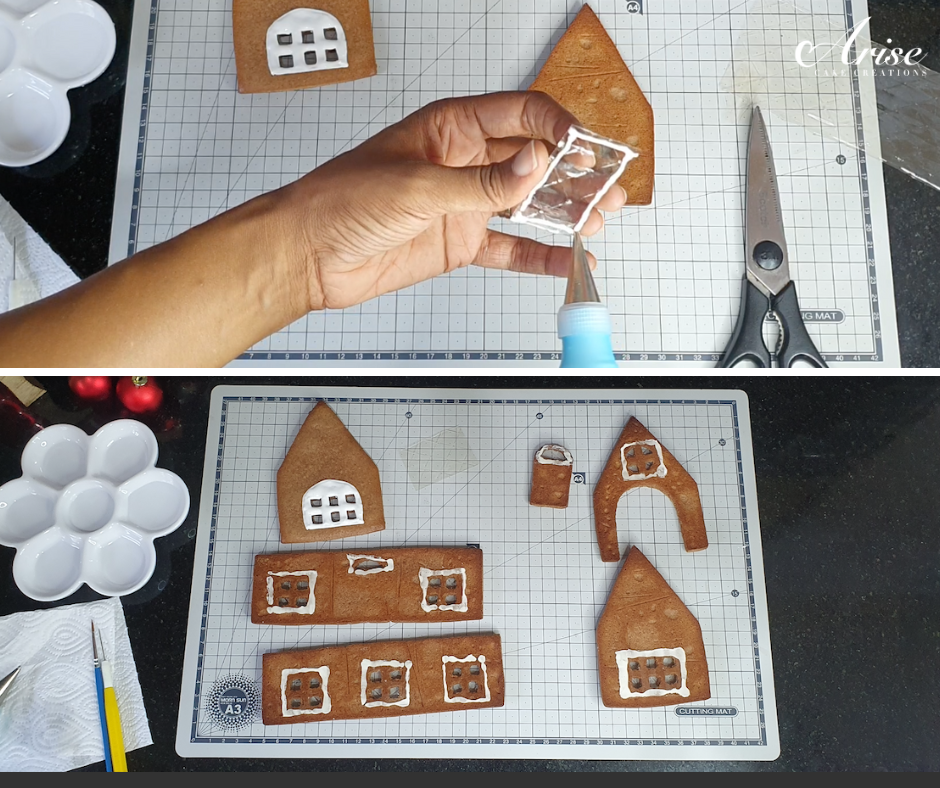
Pieces to be cut out such as the windows, the eves on the roof and the doorway. Cut around these pieces, but DO NOT remove them before baking. Bake these pieces for 6 -8 minutes, before finishing the final bake (which will depend on the size of the piece being baked).
Take them from the oven at the 6-8 minute mark and then remove these pieces. You will notice that the dough will not have spread and the openings will be sharp. Place back in the oven to finish baking; the length of additional bake time will depend on the size of the gingerbread piece(s) being backed

Royal Icing
Royal icing is the edible glue that bonds gingerbread houses together and is also used to pipe fancy, elegant decorations. Royal is so amazing, that I have dedicated a whole blog to it, which you can find here. It will explain all the details about this wonderful edible mortar.

Gingerbread pieces can be very fragile. One part of my roof actually broke in half, when it came out of the oven. I initially thought all was lost, but I was able to repair it with royal icing, it was sturdy and good to use again in no time.
Decorating The Gingerbread House
You can choose to leave the windows empty, or use isomalt, clear or coloured fruit-flavoured boiled sweets or gelatin sheets. I choose to go for gelatin sheets. If you choose to use this, cut the gelatin sheets to fit each window, then secure them in place with some royal icing.

Let the fun begin! It’s time to decorate!
If you are going to add piping decoration to the surface of your gingerbread house, it is best and easiest to do the piping before the house is constructed. Adding sweets or dragees can be stuck on once the house is constructed.
You can decorate your gingerbread house any way you want to you - you can colour the icing, add sweets, add candy canes or chocolate. Or you can follow what I did - I decided to keep all the decoration in white and silver and piped swirls and dots. I cut the door out in white fondant, painted the letter box with Sugarflair edible silver luster dust and finished the door handle with a silver dragee.
I also piped a wreath to hang on the front door.
Constructing The Gingerbread House

Have several jars ready (or anything that is suitable) to help support the pieces as you construct your gingerbread house. Pipe royal icing onto one inside edge, hold the pieces in place, be patient and wait until the icing has set and secure. It does not take long, if your Royal Icing is the right consistancy.

Follow the process of piping royal icing onto the inside edge of the roof, either use a support or hold in place until it is set.
Finishing Touches
Now that your gingerbread is standing and looking like a house, you are nearly done.
You can now proceed with the finishing touches. I used a palette knife to roughly smooth on some royal icing onto the roof to resemble fallen snow and used a scribe tool, (you can use a pin if you don’t have one) to draw on diagonal lines.
I then roughly piped icicles along the window ledges and roof edges that join to the top of the house, added shell piping to the top edges of the roof, piped down the side joins of the walls of the house and add white dragees to finish.

Battery operated Christmas Lights.
Arrange your cake board, cake stand or display stand that you will display your finished gingerbread house onto. I used two treated cut logs, to display my gingerbread house to give that country cottage feel. I also roughly added some white fondant around the based of the house to resemble piled up snow.
This gingerbread house has no based, so you can carefully lift this house onto your display stand, add Christmas battery operated lights to the display stand; make sure to leave the battery pack outside of the house so you can turn the lights on and off. Then gently lower the house over the lights.
The final icing on top of this beautiful creation, dust with icing sugar. I was planning to use this gingerbread house for display purposes only (no one was going to eat it). So I sprinkled the top with edible glitter (my glitter was non-toxic, therefore as per the FDA guidelines not suitable not for consumption). If you want to add some sparkle, make sure the glitter you use is completely edible and meets the FDA guidelines.
Here is my finished gingerbread house with lights. I love it! I was super proud at my first attempted gingerbread. Roll on Christmas 2021, maybe I will make a gingerbread castle!
Remember - There are no rules when it comes to decorating gingerbread houses. The ONLY rule is to have fun!

Back and side view.

Front View


Gingerbread Dough - For houses & display's
Ingredients
- 420g (3 1/2 cups) All purpose flour
- 2 1/2 tsp Ground ginger
- 1 tsp Cinnamon
- 1 tsp Mixed spices or cloves
- 25g egg
- 113.5g (1/2 cup) Butter
- 100g (1/2 cup) Sugar
- 230g (3/4 cup + 1 tbsp) Molasses or Dark Corn Syrup
- *1 tbsp Cocoa to add colour if using Dark Corn Syrup
Instructions
- Add flour to a bowl, add all of the spices and whisk together.
- Cream butter with sugar, mix until light and fluffy.
- Add the egg and mix in until completely combine.
- Pour in the molasses or dark corn syrup and mix in well.
- Gradually add the flour mixture and use a spatula to fold in. Keep adding flour and mixing until a dough is formed.
- On a lightly floured surface knead the dough, so it comes together. If the dough is to crumbly, add a small amount of water a little at a time.
- Chill the dough for at least 1 hour, but overnight is better.
- Cut out your pieces, chill the pieces before baking for about 10 - 20 minutes. See notes for additional information about cutting out the pieces.
- Bake at 170 - 180 C (350 F) - First bake 6 -8 minutes depending on size of pieces if cutting out windows or doors. Once windows/doors cut out place back in the oven to finish baking up to a further 6 minutes depending on the size of the gingerbread piece. See notes for additional information about baking the gingerbread pieces.
Notes:
Helpful Information
- If you have no molasses you can use dark corn syrup as a substitute. If you use dark corn syrup you can add 1 tbsp of cocoa to give the dough a bit more colour. The cocoa taste will not come through once baked.
- To help with the dough not spreading during the bake, place the cut out pieces to chill in the fridge for about 10 - 20 minutes.
- Pieces to be cut out such as the windows, the eves on the roof and the doorway. Cut around these pieces, but DO NOT remove them before baking. Bake these pieces for 6 - 8 minutes, before finishing the final bake (which will depend on the size of the piece being baked).
- Sometimes during baking, little bubbles can form on the surface. These bubbles can be popped with a pin or toothpick. Gently use a wide spatula to flatten the bubble NOT your finger.
- When baking small gingerbread pieces, keep an eye on them, since these pieces will back fairly quickly.
- Make sure to bake the same size pieces together on the same baking tray. This will ensure pieces back evenly.
- Make sure pieces are completely cool before decorating.