Hiking Kjerag Rocks!
Or at least that’s what the Kjeragbolten Facebook page says. Their Facebook page is the best resource for hiking Kjeragbolten. It’s updated daily with expected weather conditions, recommended gear, and other public service announcements.
Below was the post from the day of our hike.

This hike is one of the most popular hikes in Norway but not nearly as popular as Preikestolen because it’s more difficult and a little bit harder to get to (from Stavanger).
Similar to Preikestolen, we said that there was going to be nothing that stood in our way of completing this hike. Still, in reality, the weather in this region is unpredictable and can change by the minute.
What is Kjeragbolten?
“Kjerag” is the name of the mountain, and “bolten” means “bolt” in English. In everyday speak, it’s referred to as a boulder, not a bolt.
Kjerag stands 1,000 m / 3,280 ft above Lysefjord. At the top, wedged into a crevice and overlooking the fjord, is a giant boulder.
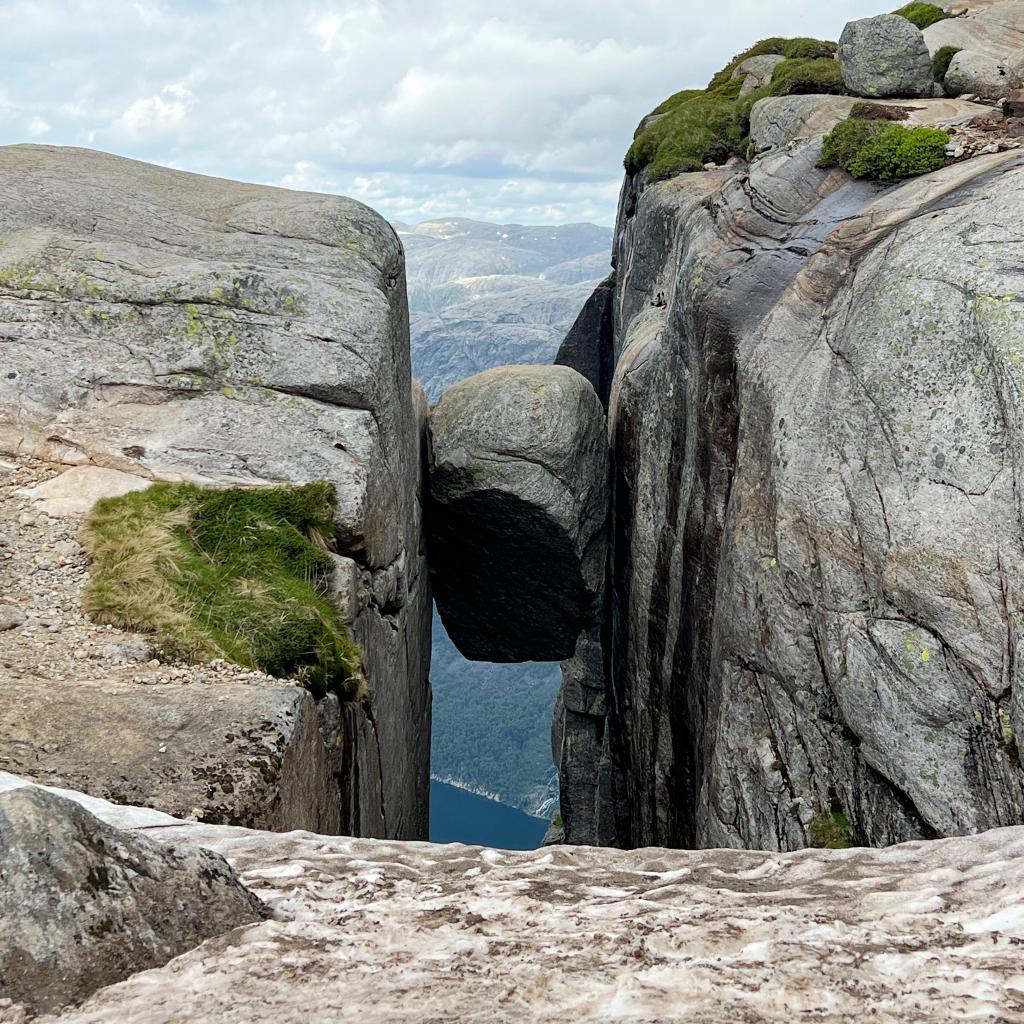
Hikers can step onto the boulder via a path on the fjord side of the boulder and pose for death-defying photos.
Here’s a photo I took from the fjord side of the boulder.

Photos can sometimes play tricks on our eyes, but there are no tricks here.
Below the boulder is a 1,000 m / 3,281 ft abyss to the water below.
Death is guaranteed if a person falls from the boulder. And despite the boulder seeming incredibly dangerous, there have been no reported deaths from falls from the boulder.
However, there have been nearly a dozen base jumpers’ deaths at Kjerag.
Getting there
We drove from Stavanger to Kjeragbolten. It was a long two-hour and 20-minute drive. The last 30 minutes of the drive were on a road that connects the main road to the parking lot, which is near the fjord’s shore.
The drive offered very little as far as amenities go. If you are looking to pick up food along the way, then the town of Ålgård is your best bet. There are a couple large supermarkets there like Extra.
Otherwise, the closest convenience store to Kjerag would probably be the Joker in Sinnes, about 1.5 hours from the Kjeragbolten parking lot.
Parking and trailhead amenities
The Kjeragbolten parking lot is at the end of a long road (30 minutes) that is sometimes overrun by sheep. A polite honk moves them on their way.
The parking fee was 300 NOK and must be paid at the payment machine upon arrival. This parking lot has a pay and display system, so put the receipt on your car’s dash.
Note: The current exchange rate between NOK and USD is about 10:1, so 300 NOK is about USD 30.
We paid by credit card, and I’m unsure if cash or VIPPS payments were accepted.
All proceeds from the parking fee cover staffing and infrastructure projects. Without infrastructure, Kjeragbolten would be inaccessible to 95 percent of hikers.
The infrastructure improvements were visible. The road from the main road to the parking lot had been newly tarmacked and had new guardrails. The parking lot had been expanded to allow for more capacity, and the toilets were new-ish and clean.
There’s infrastructure on the trail too. There are chains, stone steps, and an emergency shelter to stock and maintain.
And if things go really badly, there are helicopter evacuation services to pay for if the weather shifts and hikers get stuck at the emergency shelter or anywhere on the top.

A large restaurant/cafe at the trailhead offers sandwiches, burgers, soups, drinks, and frozen treats (read: ice cream sandwiches).
Foods on the chalkboard menu on the day of our visit were meatballs, salmon & potatoes, hamburger & fries, fish soup, veggie burger, ham & cheese sandwich, and chicken & bacon sandwich.
The prices were in line with the restaurant prices in Bergen and Stavanger. They ranged from 119 NOK for a ham & cheese sandwich to 239 NOK for salmon & potatoes.

The biggest potential problem with the restaurant is the kitchen operating hours. We visited the cafe after our hike at about 3pm and were told that the kitchen was closed. That was a bummer because we were famished.
I didn’t see the kitchen hours posted anywhere, but it seemed like it was only realistic to eat at the cafe for lunch before or dinner after an afternoon hike.
Another possibility would be for lunch after an early morning hike. We started our hike at 9:30am, and even if we had started an hour earlier, I think we still would have been out of luck with a closed kitchen after our hike (2pm).
Recommended gear
For this hike, I recommend the following:
- Hiking shoes
- Hiking poles (for use on the plateau and near the boulder)
- Gloves (e.g., training or climbing gloves, not “keep your hands warm” gloves)
- Clean socks and shoes/sandals (to change into after the hike)
- Water bladder (versus water bottle)
- Windproof outer layer
- Sweatshirt or heavy outer layer (to wear on the plateau near the boulder)
- Hearty lunch and/or snacks
- Sunscreen
This hike should NOT be done in trainers/athletic shoes or any footwear that is not a proper hiking shoe/boot.
Food
We ate a big breakfast at our hotel and immediately drove to Kjeragbolten. By the time we reached the parking lot, it’d been two and a half hours since breakfast.
Ideally, I would have eaten a small snack in the parking lot before hiking, but we didn’t have enough food for snacks and a ‘meal’ at the boulder.
We should have prepared better by stopping for additional snacks on the drive to Kjeragbolten. That was a lesson learned. The food we had cobbled together over the prior few days for our picnic lunch was not enough. I could have eaten an entire pizza by the time we reached the boulder.
We brought the leftover chicken fajitas from our dinner the night before (literally one chicken fajita), two Snickers bars, a handful of pretzels, leftover hummus from another dinner, and crackers.
Adding insult to injury, we intended to get a bite to eat at the restaurant after the hike, but as mentioned above, the kitchen was closed by the time we finished hiking.
I recommend bringing a proper meal to eat at the boulder and snacks to eat before and after the hike.
The hike
The hike was 11 km (7 miles) roundtrip and was estimated to take 5-6 hours which is a “true to size” range when hiking at a reasonable pace versus the beast mode pace we were hiking at.
It took us four hours roundtrip (not including time at the top). Looking back, we probably should have slowed our pace a bit to make life easier on ourselves, but I was again in mountain goat mode!
The Kjeragbolten hike is what I call a rollercoaster hike. From a side view, it looks like the wonderful rendering I created.

There are three big ascents. The elevation gain of this hike is 750 m / 2460 ft, including the elevation gains from each ascent in both directions.
For simplicity, I’ll refer to the ascents in this post as hills 1, 2, and 3.
Hill 1 begins immediately at the parking lot.
It’s the longest and steepest ascent of the hike, so I guess it’s a good thing that the hike starts with this, but what goes up must come down, and descending this section to the parking lot was the most dangerous section of the hike for us.
All three hills had sections fitted with chains to help with stability and footing; however, there were times when I found it easier and safer to scramble on all fours up the rocks than to use the chains.

We were breathing hard when we reached the top of hill 1. I felt a sense of achievement for about three seconds until I glanced down into the valley between hills 1 and 2 and further afield to hill 2.

There were a lot of hikers on the trail in the photo above, but the hill was so big that they were almost invisible.

We descended into the valley between hills 1 and 2 and then ascended hill 2.
I was pretty fatigued when we reached the top of hill 2, but we were halfway there! And by ‘there,’ I mean to the boulder.
Realistically, we’d only conquered a quarter of the hike by reaching the top of hill 2.

We descended into the valley between hills 2 and 3 and then ascended hill 3. I was delighted to see a flat-ish plateau at the top of hill 3.

My first impression of the plateau was that the weather had shifted. It was windy and cooler than it had been up until that point.
Protip: The trail from the summit of hill 3 to the boulder is the only section of the hike where hiking poles are useful.
I thought we were closer to the boulder than we were when we reached the top of hill 3.
If memory is correct, the distance from the top of hill 3 to the boulder was 1.3 miles. It took us a long time to walk such a short distance, and I was starving!
We could see other hikers in front of us on the plateau who were so far away, and I remember thinking that it was at least another 20 minutes to get to where they were standing, and they still weren’t at the boulder!

We made a wrong turn somewhere just before the boulder. The snow was somewhat concealing the red Ts that marked the trail.
We crawled further up the mountain to an area that overlooked the boulder area. I snapped a few photos, then we hiked back down and tried to locate the trail but still had difficulty seeing it. We started walking down a crevice and saw a red T.
Below is a photo of the crevice that leads to the boulder. I took this photo on our way out from the boulder. This crevice widens as it approaches the edge of the mountain where the boulder is stuck.

We could hear rushing water below but ultimately did not know where the water was coming from.
The snow was slushy and slippery.
The boulder came into view as soon as we emerged from the crevice.

Between the crevice and the boulder was a sloped area covered in snow. I was standing on the sloped snow, and boom, my feet slid out from under me, and I fell on my butt. This was one of five falls during the hike.
The slippery snow made taking photos of the boulder tricky. We had to stand pretty far back because slipping off the snow and into the abyss below was a real danger.
I had a few seconds by myself in front of the boulder to take photos before a woman emerged and stood between me and the boulder and asked if she could take a photo. I said no because I was taking photos, and she walked in front of me and started taking photos of the boulder anyway.
This was my first encounter with rudeness on a hike in Norway. On all other hikes, everyone neatly queued and waited for their turn to take photos.
I waited a few minutes for the woman to finish, but it was clear she wasn’t concerned with anyone but herself, so I left my spot, walked past the queue, and sat on a rock in the overlook area.
The view was spectacular.

I pulled out my snacks and inhaled them like a Labrador Retriever. Then I watched people climb onto the boulder from the fjord side of the boulder.
Getting onto the boulder was a two-step process. Hikers have to walk along a narrow ledge and then hop from the ledge onto the boulder.
As shown in the photo below, a small ledge wraps around the rock on the right. It was about a foot wide.
Some people walked on the ledge face-forward, looking at the boulder while walking. Others put their backs to the rock on the right and walked the ledge sideways.
Once they were on the left side of the rock on the right-hand side of the photo, they had to hop onto the boulder.
I did not stand on the boulder, but I think the hop would have been the most terrifying step of getting onto the boulder.
While observing the overlook area, I saw many people step onto the boulder. The craziest was a teenager with little experience (maybe no experience?) doing handstands, attempting to do a handstand on the boulder.
It was fundamentally stupid, and I thought I was going to witness the first death of someone by falling from the boulder.
Another somewhat crazy thing I saw was two people on the boulder. Imagine a person on the boulder and another person hopping onto the bolder but losing their balance, and both tumbling into the fjord below.
I also saw a dad bring his three kids onto the boulder (one at a time, not simultaneously).
I didn’t understand the unnecessary risk these people were taking – handstands, two people on the boulder, kids on the boulder. It was wild.
I planned to take a few more photos of the boulder on our way out of the area, but the queue was too long, and we decided to start hiking back.
We were navigating through the crevice (only wide enough for one-way traffic) when we got caught in a traffic jam. There was a queue of people wanting to come to the boulder and a queue of people wanting to leave the boulder.
Peter and I were standing on a “snow bridge” in the crevice, waiting for an oncoming dog to move out of the way, when the companion of the handstand’er jumped from behind me and over my head.
He landed on the snow bridge, and the bridge collapsed.

I fell into the crevice in the area below the rock that the woman in the photo above is squatting on. Peter fell on top of me. The idiotic companion of the handstand’er also fell on top of me.
No one knew what was below the snow in the crevice, and I was at the bottom of the pile. I was covered in slush and men.
I was angry because none of what had just happened needed to happen.
First, I like dogs, but I didn’t think dogs should be allowed on the hike.
Second, it was unnecessary for the man behind me to jump over me just because he was impatient. Where did he think he was going to go? Did he think Peter and I were just standing on the snow bridge, holding up traffic for fun?
I yelled. I yelled at the man with the dog. I yelled at the man who jumped over me. I yelled at the people standing in the crevice who wouldn’t move to let us through. I yelled at anyone and everyone.
The rath had been unleashed (aka hangry).
Peter and I eventually crawled out from below the snow bridge rubble and out of the crevice. I scanned my body for any injuries. My adrenaline was running hot!
Any broken bones? Scrapes? Pulled muscles? No. None. It was a miracle. I breathed a sigh of relief, and we continued on our journey.
Two hours later, we were back at the parking lot, and I swapped my hiking socks and shoes for new socks and trainers. It felt amazing!
Difficulty
This hike gets a difficulty rating of 7/10.
It took us the same time to hike up (outbound) as it did to hike down (return). The rollercoaster nature of this hike is the reason for the long return journey time.
As with Preikestolen, I tracked the outbound and return hikes separately.


I did not take any photos on the outbound journey, and I think we stopped twice on our way up. All photos were taken on the return journey, which overstated the return journey time by 10 minutes.
What we’d do differently
What would we do differently if we were to do our hike over again?
1) We would have packed more food.
Our light snacks were not enough to satisfy our hunger by the time we reached the boulder.
2) I would have brought a heavier outer layer or a puffy jacket.
It was windy and cold on the trail from the top of hill 3 to the boulder and freezing at the boulder.
The chilly temperatures and hunger (knowing we had at least two hours of hiking until we got back to the restaurant) resulted in us spending less time at the boulder than we otherwise would have.
Resources
Below is a list of resources we used to prep for the hike.

0 comments on “Kjeragbolten hike (Lysefjord)”