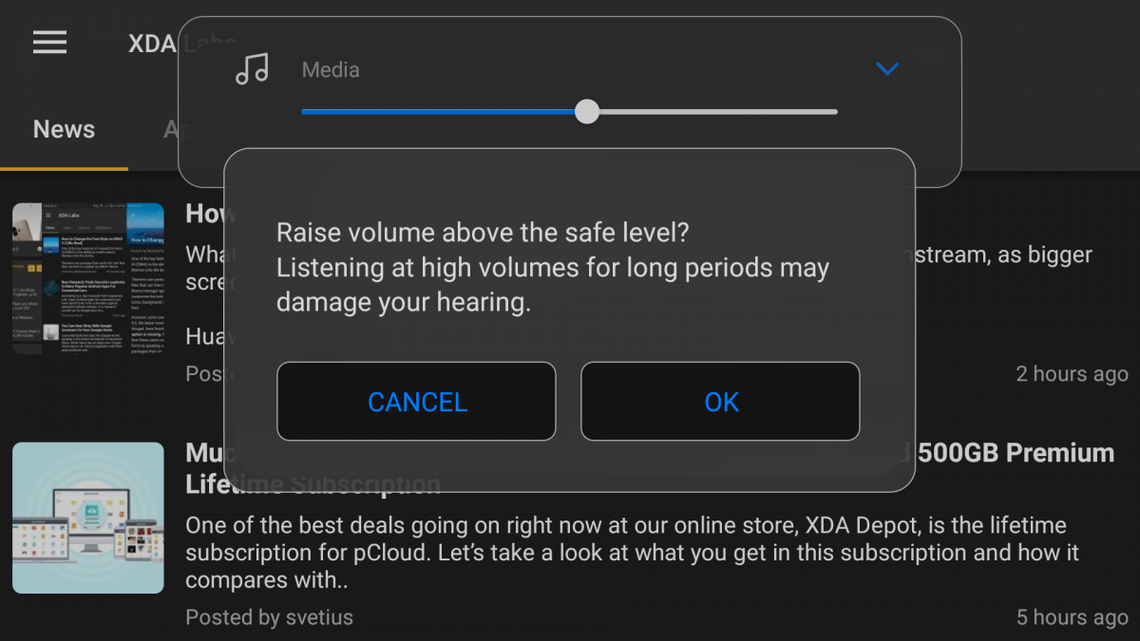
Those of you who live in one of the member nations of the European Union have probably come across the warning when trying to raise the volume of your headphone as shown in the feature image above.
According to regulations set by the European Committee for Electrotechnical Standarisation (CENELEC), all electronic devices capable of media playback sold after February 2013 must have a default output volume level of a maximum 85 dB. Users can choose to override the warning to increase the volume to a maximum of 100 dB, but in doing so the warning must re-appear after 20 hours of music playback.
While we aren't going to get into a debate about the efficacy of this regulation in promoting good health, users who frequently choose to bypass this warning often wonder if this process can be automated. There are many cases where it is rather annoying having to manually agree to override the volume limit, such as when you start music playback remotely on a Bluetooth device, so we wanted to set about figuring out a way to automatically bypass this warning.
Solutions to bypass the "safe volume limit" already exist if you search our forums, but so far all of the solutions have required you to install an Xposed Module. This necessarily limits who can use it, as the Xposed Framework requires you to have root access (which means an unlocked bootloader on most phones) as well as being on pre-Nougat versions of Android. But after digging into AOSP and various system settings, I've discovered a way to bypass the high volume/safe audio limit on all devices without requiring root.
By following this guide, you accept any risks involved with listening to media at high volume levels.
Safe Audio Warning Bypass Tutorial
If you've read my previous article on enabling Immersive Mode without root access, then you may have started playing around with some of the settings you can find hidden on your phone. If you haven't, I highly recommend you do, as I've found that almost every device has a ton of goodies just waiting to be discovered. This trick is no different as we'll be using a system property to bypass the safe audio warning.
Specifically, we will be modifying the System.Global property audio_safe_volume_state both on boot and periodically so Android will always think you have consented to bypass the warning. This property is defined in AOSP, which we're reproducing below. There are several states this property can take, ranging from 0-3. 30 seconds after boot or after every 20 hours of continuous music playback, the state is set to '0' or 'not configured.' It is then set to '1' for 'disabled' or '3' for 'enabled' depending on your Mobile Country Code. If you live in the E.U., this property is set to '3' by default but is changed to '2' for 'inactive' whenever the user manually bypasses the volume warning. We will be changing the value of this property to the 'inactive' state (changing it to 'disabled' never worked for me, in case you're wondering).
You'll first need to install Tasker and AutoTools so we can automate this trick. Technically, any other automation app apart from Tasker can be used, but I'm only familiar with Tasker so you'll have to make adjustments on your own if you prefer using a different app. AutoTools, though, is critical to this trick as this plug-in will allow us to control Secure Settings on our device.
As explained in my article on toggling Immersive Mode, we need to grant the WRITE_SECURE_SETTINGS permission to AutoTools. This is because the command for controlling the safe audio volume state is defined under the Settings.Global class, though the exact syntax for the command is hidden in AOSP (just like it was for Immersive Mode). If you've already granted the WRITE_SECURE_SETTINGS permission to AutoTools after having read my previous tutorial on Immersive Mode, then you can skip the next section. If not, then you'll have to set it up.
Granting Secure Settings Permission to AutoTools
Under Android's permission management system, applications define the permissions they want to be granted in the Manifest file. Users can then grant or deny permissions on installation (pre-Marshmallow) or on demand (Marshmallow+). However, there are certain permissions that applications cannot be granted even if they request it in the Manifest, such as WRITE_SECURE_SETTINGS. This is because granting any application a permission as powerful as this would give that app a ton of control over your device.
But there is one workaround that we can use to grant the WRITE_SECURE_SETTINGS permission to any app we want. By using ADB's package manager (pm) tool, we can grant any permission to any application we want (provided that application requests that permission in the Manifest file).
The first thing you'll need to do is install the ADB binary onto your computer followed by the right driver for your device. Then, enable USB Debugging in Developer Options (go to Settings --> About Phone and tap on Build number 7 times if you haven't already) and connect your phone to your computer. Finally, send the following command once you've opened up a terminal:
adb shell pm grant com.joaomgcd.autotools android.permission.WRITE_SECURE_SETTINGS
Now AutoTools will have the ability to change any Global, Secure, or System setting on your device. There are various ways you can play around with these settings, and the list of available settings in each category completely depends on your device and software build, but that discussion is for another time. In any case, we'll move on show you how to use AutoTools to control the safe volume state.
Disabling Safe Audio Warning on Boot

Here's the description of the profile for those of you who are familiar with Tasker. If you aren't familiar with Tasker, read on for step-by-step instructions.
Open up Tasker so we can create a new profile. At the bottom right hand corner tap on the + icon to create a new profile. Add an new Event context and go to Tasker --> Monitor Start. We are using this Event context which triggers when Tasker starts up rather than the Event context which activates when the phone boots because the former is far more reliable than the latter.
In any case, press the back button as we will now create a Task associated with this profile. Name the Task anything as it doesn't matter. Once you enter the Task creation screen, press on the + icon in the bottom middle of the screen to create a new Action. For the first action, go to Task --> Wait and have it wait for 30 seconds. This accounts for the "30 second after boot" rule used in Android to set the safe volume state.
Next, create a new Action and go to Plugin --> AutoTools --> Secure Settings. Press the pencil to open the configuration screen for AutoTools. Go to Custom Setting. For the Setting Type enter Global. For the Name enter audio_safe_volume_state. For the Input Type make it int. For the Value make it 2. Check to make sure you put everything correctly, the configuration should match the middle screenshot below. The command must be sent exactly as I've written or it will not have any affect.
Once you're done, back out to the main menu of Tasker as we'll need to create another profile. The one we just created accounts for when the safe volume state is set 30 seconds after boot, but for those of you who almost never reboot your device we'll make another profile to periodically set this value.
Disable Safe Audio Warning Periodically

Here's the description of the profile for those of you who are familiar with Tasker. If you aren't familiar with Tasker, read on for step-by-step instructions.
Create a new profile, this time with a Time context. Unfortunately I'm not aware of any method to get the current cumulative time of media playback without root, so we'll instead just periodically set the safe volume state to inactive once every 24 hours (... it's not like you guys actually listen to 20 hours of music within a 24 hour period, right?). Anyways, Tasker's interface for setting a periodic Task is kind of terrible, but the gist of it is that you want to set the "From" and the "To" time to the same time. This way, Tasker will treat it like you want the Task to only trigger once at a set time (I made it 1 minute before midnight).
As for the Task, just copy what you did for Action #2 in the previous profile. There's no new or different Action in this case, as all we're doing is changing the value of this Global system property once every 24 hours.
Now that you've set up both of these profiles, you're done! Reboot your phone and you should now no longer see the "safe volume" warning when you plug in your headphones.
Download and Import to Tasker
As always, we’re providing the scripts' XML file that you can download and import. Simply download the files from the link below and save it anywhere on your internal storage. Open up Tasker and disable Beginner Mode in Preferences. Then, go back to the main screen and long-press on the “Profile” tab up top. You should see a pop-up with one of the options being “Import.” Tap on that and browse to where you saved the .prf.xml files and select that file to import. Repeat for the second profile.
Download the 'Disable Safe Audio Warning on Boot' Profile
Download the 'Disable Safe Audio Warning Periodically' Profile
We hope you find this tip useful. Let us know in the comments below if this works for you!