Subwoofer enclosure bracing?

Hoodcom

Well-Known Member
I've bought a Dayton Audio RSS460HO-4 18" subwoofer, and have plans to build a sealed 10 cubic foot enclosure for it. Basing off the inner/outer dimensions of these plans so it will match my Stroker 18 cabinet when it gets built. :thmbsp:

Even ran through WinISD to get a graph of the frequency response. :banana:
http://reeseriverson.com/rriverson/Dayton18inch-10cubicftbox-spldata.png

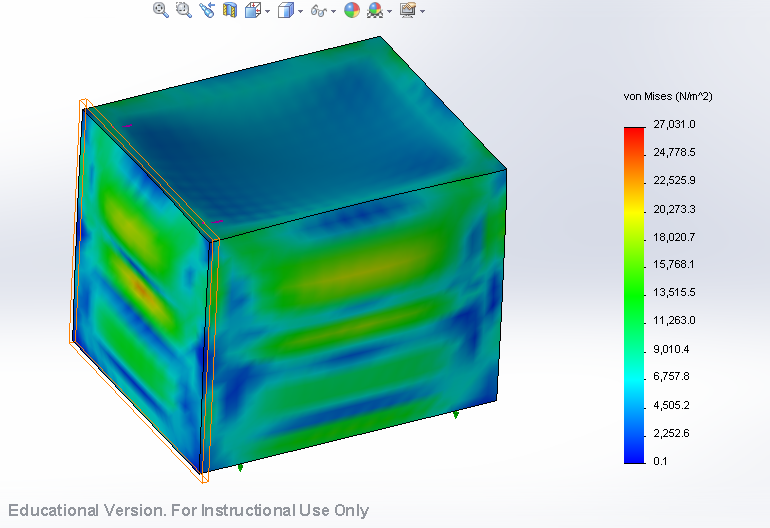
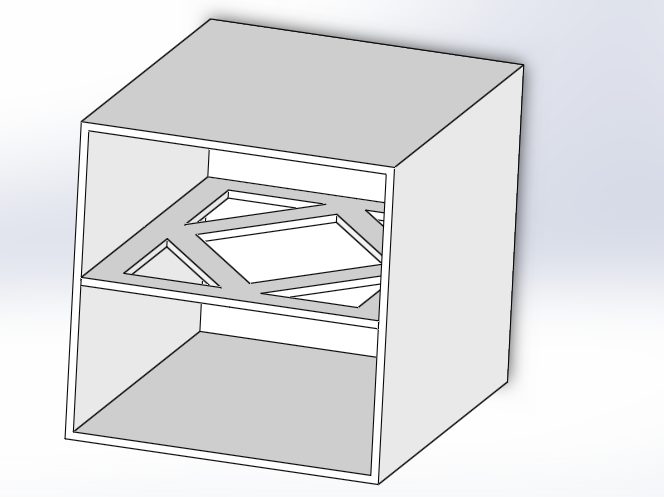
However upon researching here at AK I found a lot of mention on internal bracing, and I have seen various methods as well. So I have some questions. :scratch2:

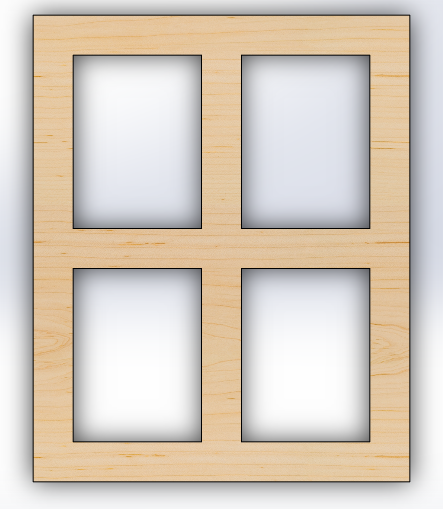
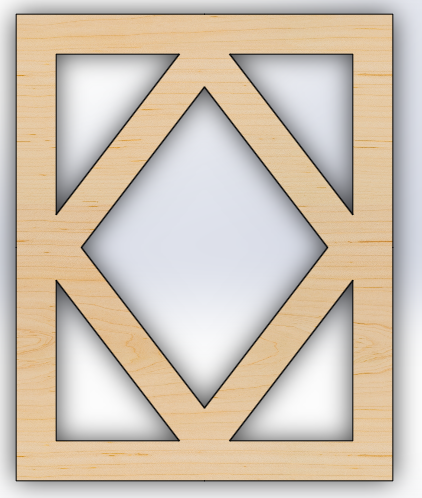
I'm thinking of 3/4" inch birch, (Especially after reading this thread), and for an enclosure of 29 3/4" H x 23 3/4" W x 35 3/4" external dimensions, what would be ideal in brace support? As far as sections of it, go... or design..

*Edit* I plan to use 1" MDF, as an update.

I noticed that a couple of posts here also show some bracing designs to include support of the front baffle like this one.

*Edit 2* After running things through WinISD and some ideas from researching, I found that a 10 cubic foot enclosure for a single driver wouldn't be a good idea, especially when power handling is a concern with it's excursion capability... however! Since I have two Dayton drivers, my new plan calls for a 7 cubic foot, dual opposing enclosure for use of both Dayton drivers. :)
 
Last edited:
The ports will act as braces and it doesn't look like you have much baffle left to brace. Go with 2x thick front baffle and you are good. Running a couple (several?) braces (3/4" x 1 1/2"?) top to bottom and side to side and connecting them to the rear panel should do the trick. Again, the ports are going to really stiffen up the cabinet. Many DIY cabs have more bracing than needed.....but the braces are cheap and if you don't plan to move or ship it weight is a non-issue.

Not enough bass from the C-V collection?
 
Remember, the enclosure for the Dayton will not be using ports.

And no, not on the bottom end. Since the Dayton will have better extension down to 10 ~ 20 hertz. :D

My idea is to cross the main towers at 50Hz and let the subwoofer handle everything below.
 
If you're serious about bracing, window braces are the way to go.

windowbrace.gif


If that's more trouble than you bargained for, just running oak dowels from side-to-side, front-to-back and top-to-bottom will also help a lot.
 
The strongest enclosures I've made didn't have bracing but instead used Kreg Pocket hole screws and Tite Bond glue. With this combo you can stand on the joints.

It's worth watching the Kreg video on Youtube.
 
Strength isn't really the issue, or at least I don't think that's where the OP was going. What's of concern is minimizing the resonances and flexure of the cabinet walls.
 
Strength isn't really the issue, or at least I don't think that's where the OP was going. What's of concern is minimizing the resonances and flexure of the cabinet walls.

This is exactly it. :thmbsp:

Sorry if I hadn't been clear, but you nailed it. :)


And for the window bracing, I can use this method to connect all for sides to bracing couldn't I? Like part of a window brace connecting to the rear of the cabinet, to the window brace that connects to the sides?
 
This is exactly it. :thmbsp:

Sorry if I hadn't been clear, but you nailed it. :)


And for the window bracing, I can use this method to connect all for sides to bracing couldn't I? Like part of a window brace connecting to the rear of the cabinet, to the window brace that connects to the sides?

Yes, connecting all the braces together is best, although it can be a little tricky to get everything to fit together.
 
Well, change of mind on material due to availability in my area, but I am probably going to go ahead and use MDF plywood. 3/4". So would this change how much bracing I may need?
 
Either way, you'll want bracing. One rule of thumb I've seen is to brace about every 7", so there's never more than 7" of unsupported wall. That rule may be overkill for a subwoofer, but it's a good starting place.
 
I built my first sub cab not long ago--about 3 Cuft. for a Dayton 12" ported sub--has a 4" round port about 15" long with an elbow. 3/4" MDF. I used no bracing at all. cab is glued/nailgun connected. It was just awful !!! Everything shook and vibrated, even the port sounded like it was going break into pieces--really bad !!!
I went back in and used 2x2" braces side to side and front to rear and connected them; made a support for the plastic port and glued that to the side wall of the cab.
It now sounds great !!! I am now a big believer in bracing !!!
 
If you're using simple cross braces (nothing wrong with that), a tip to make them more effective is to install them under tension. Either cut them a hair too long so you have to wedge them into place (the easy way) or a little short and use screws through the sides to pull the sides in to meet the brace. That will push resonances further out of the passband than putting in a "just right" brace.
 
Either way, you'll want bracing. One rule of thumb I've seen is to brace about every 7", so there's never more than 7" of unsupported wall. That rule may be overkill for a subwoofer, but it's a good starting place.

With the length of the enclosure, I calculated about 8.5" spacing per brace if I fit four in there... Then again I might have missed something. :scratch2:

I guess the coffee was a little slow kicking in this morning. :yes:

Haha, no worries. :)

If you're using simple cross braces (nothing wrong with that), a tip to make them more effective is to install them under tension. Either cut them a hair too long so you have to wedge them into place (the easy way) or a little short and use screws through the sides to pull the sides in to meet the brace. That will push resonances further out of the passband than putting in a "just right" brace.

What are other possibilities with bracing styles? Also I had wondered about at least installing them under tension of sorts, thanks for that tip!

And how about insulation and bracing in a cabinet? I want to make sure I can still fit the insulation inside. :D
 
This was my solution for a 15 cu. ft. cabinet:

IMG_0002-6.jpg


The braces on the side panels are dadoed into the plywood. I have it from a pretty good source that I could have saved some trouble by using closet rod from the side panels to the center window pane brace. The trick is to tie all six panels together for best results.
 
Nice example, thanks for sharing. :thmbsp:

Well, change of mind on material due to availability in my area, but I am probably going to go ahead and use MDF plywood. 3/4". So would this change how much bracing I may need?

As an update to this, I can source 1" MDF, so I'll be using that.
 
Even without the ports, that front baffle may not be readdily supported by braces. You might want to consider using 2 layers of material glued together for the front baffle to bring the resonences down. Just an idea to consider.

Shelly_D
 
Good evening everyone,

Just wanted to share some insight to structure and internal bracing.

I've spent a lot of time over the past year optimizing the almighty Altec A7 in structural terms to reduce the unwanted coloration / resonances.

Let me make one thing clear - the box will always have a resonance. This is just changed, either up or down depending on the structure mass etc.

The most effective way to reduce the vibration of the cabinet that causes coloration is unsupported flat panel. Always support these with a brace designed around a logical load path that dissipates the load into more structure.

Corner joints will only help the situation if they are there to be loaded by the aforementioned load paths.

This evening I made a simple model for proof of concept and did simple stress analysis to prove a point --> the importance of load paths.

Window braces are good, very good compared to an non-braced cabinet. However I have come up with a simple design that is better and not much more complex. At any rate, I am here in the spirit of AudioKarma to share my discovery with you.

I should also note that the reference cabinet used was made to the specifications provided to us by the original poster. I did this so that the experiment might produce tangible results.

Exhibit A. The common window brace
brace2_zps221ba480.png


This particular brace yielded well in the stress plot below, posting a stress yield point of 24418.4 Nm^2. Fine, whatever - just a point of reference.
result1brace1_zps03461f17.png


Exhibit B. The Evan Brace
brace3_zps93feb1bf.png


When inserted into the cabinet it produced a marked improvement: 27,031 Nm^2.
result2brace3_zps83fe629f.png


The load path geometry has remained the same, the beams are all 3 inches wide and 0.75 inches thick. With basic changes, I have increased the stiffness a bit over 10%. Take a look at the color plot of the solid model - the red bit in the center of the side panel decreases significantly.

Simply connecting two faces together will significantly stiffen up the box. However, as the above results have shown, splitting your panel load source into two perpendicular faces is stronger. Use this technology to your advantage!

This is a capture of the assembly with the lid off, just for reference. All forces, fixtures and cabinet pieces remained constant. The only variable was the brace.
Capture_zps27b17924.png


Final words of wisdom: When distributing a load via braced structures, don't forget to fillet the corners. I skipped this for the sake of speedier FEA solving. The larger, more gentle radius you can afford, the better. If you cannot brace, (as others have said) thicken the panel or use a more dense material. This may be especially difficult on the front baffle due to having the driver in place. Lastly, regarding load paths, don't be afraid to think in 3D!

Hopefully this post comes to you before the build and can actually be of some assistance! Good luck, Sir.
 
Last edited:
Back
Top Bottom