A mood board is a collage of images, video frames, patterns, or text that convey a certain feeling at a glance. Mood boards are widely used in various applications of visual art including branding, graphics, fashion, cinema, industrial and interior design. Sometimes, they are even used in nonvisual fields (e.g., music, fragrance design) to capture moods and feelings.
Why Use Mood Boards for UX or UI Design
In UX design, mood boards are used to visually show the feelings or values that the digital product should create. Mood boards are collages that are approachable and easy to understand — even for people with little design experience.
For example, imagine your team is building a career app for urban-construction workers. You might list some words describing the visual vibe you’ll aim for:
- Motivational
- Energetic
- Bright
Such words could work well for establishing a tone of voice for content, but they don’t work as well as a guide for visual design or branding. Instead, you might use a mood board with images of hard-working young construction workers and energetic city scenery, in a blue-and-yellow color palette. A mood board will give the team visual cues about the kind of app they should design.

Typically, mood boards are used to define the product's primary UI colors and the visual design identity, but they can include other aspects of the design. For example, your mood board might also have:
- Tone-of-voice words
- Marketing or persuasion ideas
- Interaction-design patterns
- Inspirational screenshots from other products
This collection might even be used later to help inspire a visual style guide.
Moreover, mood boards can help your team to:
- Generate ideas by collecting design inspiration together in a single place
- Quickly convey the product’s tone
- Align interpretations and future design directions
They also have the advantage that they can be created collaboratively: multiple people can contribute to them, whether synchronously or asynchronously.
When to Create Mood Boards
Mood boards are used early in the design process of a new product or when substantially revising an existing product. For example, they might be created during the Define or Ideate phases in the design-thinking cycle. They help gather consensus on the style of the visuals before designers begin working on prototypes.
Anyone in the team can create a mood board, and they can be particularly effective when created collaboratively. Typically, creative professionals such as user-interface designers, visual designers, platform designers, or motion (interaction) designers lead the process, but they can involve other stakeholders like product owners, design leaders, or content managers. It is best to create several mood boards to experiment with multiple moods and find one that best fits your product.

Mood boards can also be used as part of the persona-creation process, to helps visualize persona characteristics such as hobbies, residence, occupation, favorite things, or beliefs.

How to Create and Use Mood Boards
Create your own mood board by:
- Reviewing any existing brand or product-identity materials
- Selecting the tool
- Choosing the moods to convey
- Collecting visual resources
- Arranging visuals in an orderly layout
- Sharing with your team
You might perform all these steps on your own, but steps 3 and 4 are well-suited for collaboration. Consider a mood-board workshop to collect input and ideas from your team or ask each teammate to make a mood board on their own and combine them as explained below.
1. Review Existing Materials
If your company or team already has an established brand identity or style guides, review these documents before creating a mood board. Use them as a starting point to ensure your mood board will comply with existing standards.
2. Select the Tool
Choose the tool you’ll use to create your mood board. You can create a physical or digital board.
Physical Boards
If you or your team appreciate hands-on activities, making a physical board using a whiteboard or a foam board might be a good option. Adding and moving around sources with hands can stimulate inspiration and ideas.
However, this option isn’t a good for remote teams and is harder to save and share out throughout the organization. In addition, it can be time-consuming and wasteful to prepare and print physical images and use tools like glue, pins, magnets, and tapes.
Digital Mood-Board Tools
Essentially, all you need is a tool capable of collecting and moving visuals around. Many visual-design, UI-design, and prototyping tools support these activities. If you plan to create your mood board collaboratively with your team, choose a tool that everyone can work with together. Digital whiteboarding tools like Miro, Mural, or FigJam work well for remote mood-board workshops.

3. Choose the Moods
To choose the right mood, think about your product and the users. What vibe or mood do you want your product to deliver? How do you want your users to feel when using the product? If you are working with creative professionals, discuss how they want the product to look, and write down the words they use.
If you’ve come up with a few words, look for synonyms using dictionaries or mind maps. Think about the subtle differences between each word and choose 4–5 words that best represent the mood you want to convey. This process is similar to that used for establishing a tone of voice of a product — where you write multiple tone words and group them.

4. Collect the Visuals
Find and collect any type of visual resource –- images, illustrations, video frames, patterns, or text –- that are relevant to the mood. Consider looking for visual resources in the following places:
- Google Image Search
- Social media
- Pinterest, Behance, or other image-curation services
- Physical objects such as magazines, books, or personal artifacts

As you collect these items, strive for unity. Although a mood board is a melting pot of diverse formats, they should all fall under a certain theme and convey the moods you’ve chosen. Avoid making a messy board with contradicting images.
For example, calm and serious characteristics should not be combined with fun and cute ones. If you have several distinct visual concepts in mind, make separate mood boards instead of squeezing them into one.
You may include established product images or screenshots of competitor products. However, remember that mood boards are about the visuals, not about the features. Excess use of screenshots in a mood board may risk prematurely focusing on specific outcomes or features.

5. Arrange the Visuals
A good mood board has a clear visual hierarchy. Decide on the importance of each asset and prioritize important ones that best deliver the mood you want. Make the key sources bigger than others or place them in the middle of the mood board. Also, grouping resources of the same type can help other people quickly navigate your mood board. Utilize white space to create an orderly separation between each item.

6. Share the Board
If you created a mood board on your own, it’s a good idea to allow your teammates to provide feedback and add suggestions.
If you collaboratively created a mood board with some of your teammates, share the finished board with the rest of your team or department. Clearly communicate your rationale for choosing the moods and visuals.
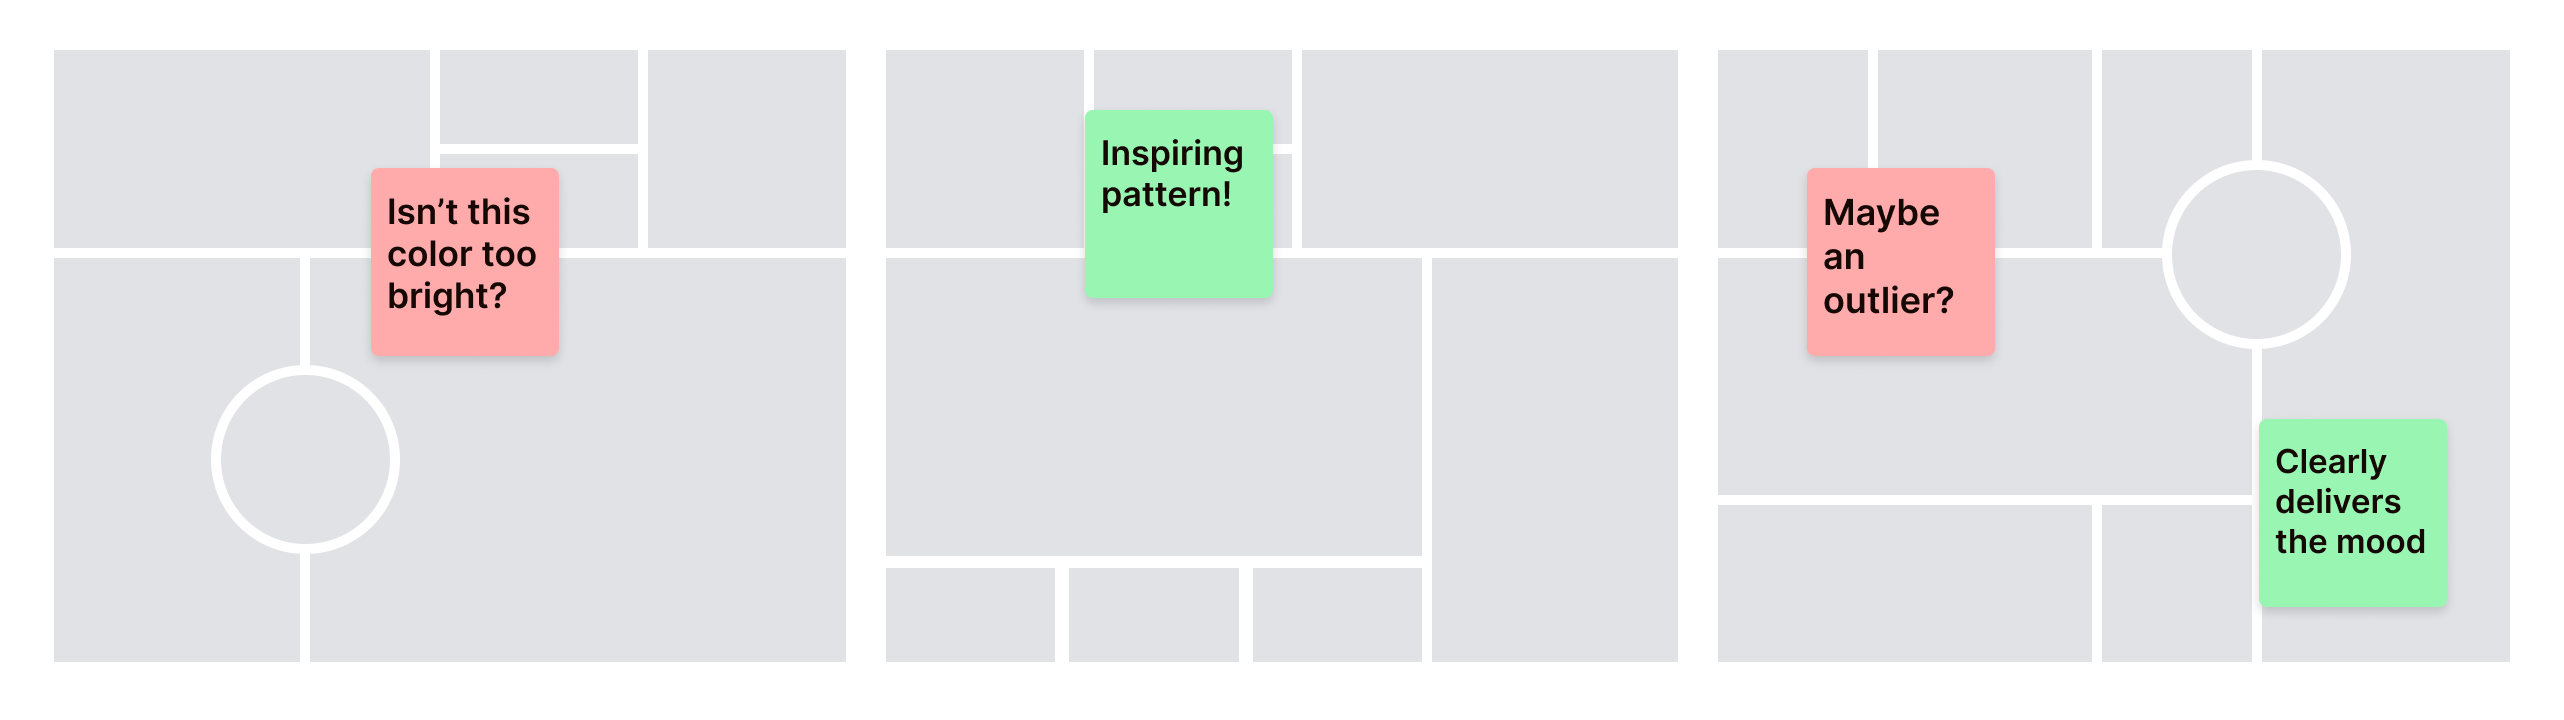
If you opted to have each teammate create a different mood board, gather the mood boards made by your colleagues in one place and compare them. You will see some common and different ideas as everyone has their unique visual perspectives.
Give feedback to your colleagues by leaving sticky notes directly on the board. Color code them if necessary, such as green for what you want to take away and red for what you’d want to avoid. After discussion, finalize the mood board by replacing and removing assets from each other’s board.
Conclusion
Making mood boards is a great way to gather diverse visual characteristics, experiment with them, and decide the overall visual and emotional direction of a product. By following these concepts, your mood board will provide your team with the proper guidance throughout the design process.